I tend to blog about edtech tools that students use more so than tools strictly for the teacher, but classroomscreen.com breaks the mold! Simply put, classroomscreen.com is a classroom facilitation tool. The teacher/presenter displays the webpage up at the front of the room, and has a list of tools to choose from:
Random Name Selector
Sound Level
Qu-Code (to share websites)
Drawing
Text
Work Symbols
Traffic Light
Timer
Clock
image from classroomscreen.com
These tools can all be used simultaneously and serve many purposes. My personal favorites are the sound level check, work symbols, traffic light, and timer.
If you're looking for a solution to help facilitate small group work or stations in your classroom, check out classroomscreen.com!
This post was not sponsored, all views and opinions are my own.
This week, I decided to start a video reflection series on Blended Learning.
Topic 1: Content Curation.
I've spent a lot of time lately thinking about content curation. I find so many great articles and infographics online, just to lose them in the ocean of information that is the internet. I have yet to find the perfect tool for myself, but I think I'm getting closer. Check out the video below, and feel free to add comments on you favorite tools!
It's the idea that most direct instruction moves from whole group class time to an individual space. This allows the classroom to become a place where the teacher is allowed to take on more of a facilitator of learning roll, as opposed to a lecturer. In part, you are setting up a piece of your classroom as an asynchronous learning environment. Meaning that you can and will learn outside of the classroom: at anytime, anyplace.
A misconception about the flipped classroom is that it is dependent on the teacher making all of the content in a classroom for students to read and view. If that were the case, you would simply be recreating a digital textbook. A flipped classroom involves communication from all stakeholders involved. In other words, teachers & students are involved in the creation process of a flipped classroom.
This post will be the first in a series that will focus on tools that both students and teachers can use for a Flipped Classroom.
Production Tools
Apple Clips
iPhone & iPad App
Clips is a newer app from Apple that I think of as a cross between the camera app and iMovie. It has some editing abilities, but keeps it very simple for users of all ages to quickly produce a short video.
A great bonus for Apple Clips, is that the app does real time subtitles as you are talking! Here is a clip that I made right when I learned about this feature
Ideas for flipping your classroom with Apple Clips are:
Sending out class announcements.
Showcasing Student Projects
Book Summeries
Field Trip Highlights and Learnings
Screencastify (Free & Pay Versions)
Google Chrome Extension
Screencastify is a simple yet powerful tool that anyone can use with just a few simple clicks. As the name implies, the Chrome Extension allows students and teachers to record and voice-over anything on their computer screen. The camera function also allows recording the presenter’s face in the corner of the screen to add personality to the clip. Along with its ease to use, Screencastify automatically saves all files directly to your Google Drive automatically. The extension is free for 10 minutes of recording time per clip, with 50 clips to record per month.
Ideas for flipping your classroom with Screencastify are:
Recording teacher lectures for students to review
Recording student presentations
Creating virtual tours with google maps or google earth
Making quick tutorials for multi step procedures students may need to follow to complete a task
Spark has a few creative options, but let's just focus on Spark Video.
Spark video allows teachers and students to put together videos through a "PowerPoint style" format. This is a nice feature because it will allow for voice over to be recorded on each individual side, as opposed to having to do an entire recording in one take.
Spark allows users to import video clips into a project, but is not set up for recording videos straight into it. In other words if a teacher or student wanted some video slides, they would need to record them with another program or camera and import them.
Spark will save all projects into its cloud system so you can access them from multiple devices.
Explain Everything(Trial then Pay)
Multi-device - Chrome OS & iOS Friendly
Explain Everything is a recordable whiteboard that teachers can use for their classrooms. The trick on a laptop will be trying to free draw with a mouse, but if you have a touch screen device with a stylus or a Smart/Promethean Board, you may be able to use it with ease.
Explain Everything is actually much more than a whiteboard app, it allows you to import documents, videos, and more and then annotate and record on top of them. You have unlimited pages to add to your project, and each page has unlimited zooming capabilities (both in and out). You may also record page by page in your presentation and pause in the middle of your recording.
Explain Everything also has it's own cloud storage where your projects can be accessed from multiple devices.
Inquiry Based Instruction has been an area of study for me for the last couple of years. In my opinion, teaching through inquiry is not only engaging for our students, but develops an essential skill that our kids need to be successful in the 21st century. In this post, I want to share a few of the resources I have been using for the last few years, as well as a few resources that I just learned about.
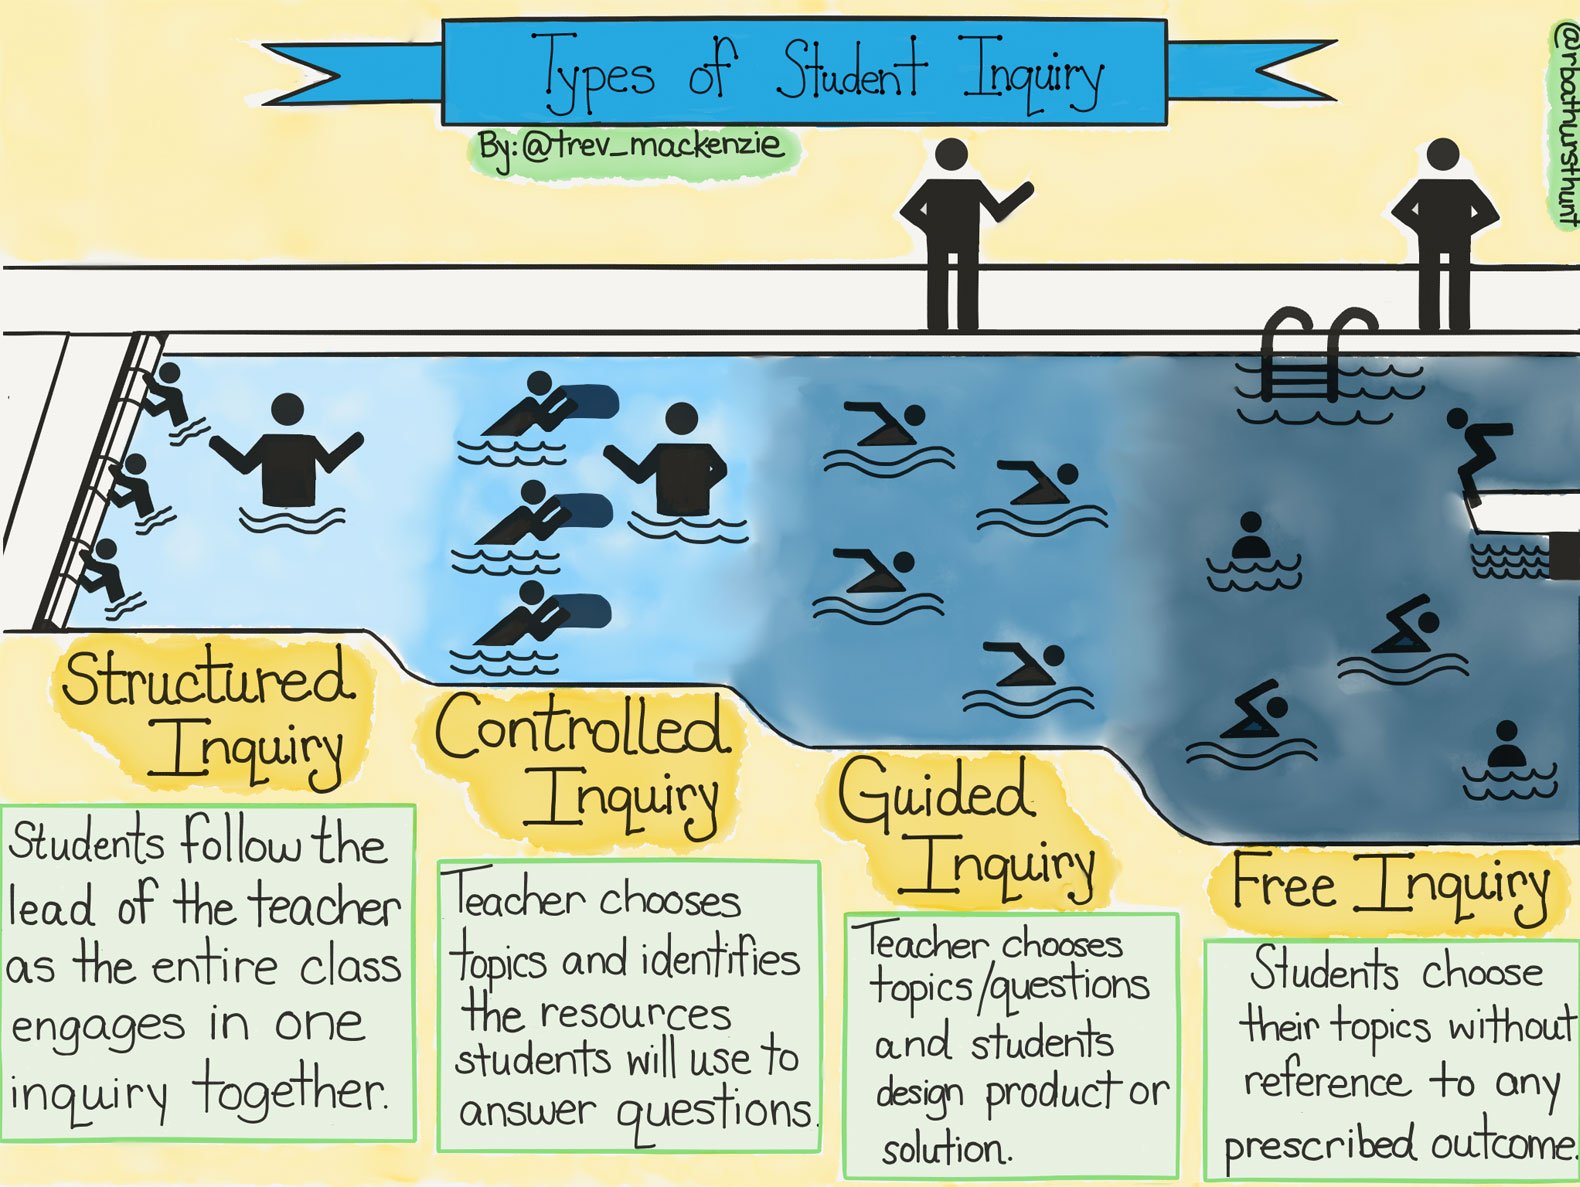
Before finding your digital resources to support inquiry in your classroom, I highly recommend reading Trevor MacKenzie's book, Dive Into Inquiry. In his book, MacKenzie walks teachers through the 4 types of student inquiry: Structured, Controlled, Guided, and Free. This process allows educators to understand that inquiry based instruction is not just a free for all approach, but a structured practice.
Wonderopolis is a fantastic website that models inquiry for students and teachers. Every topic on Wonderopolis begins with a question, and then follows up with an article that allows students to explore that question. Your students can even submit questions to the Wonderopolis site as well as vote on other questions on the site to be explored next.
The Question Formulation Technique or QFT is a collaborative way for students to work in teams to brainstorm questions based off of a teacher given focus. It teaches students how to prioritize their questions and evaluate the differences between open ended and closed ended questions. The Right Question Institute website is full of resources to make the QFT process a success in your classroom.
As students toward Free Inquiry, the Genius Hour website give students and teachers a structure on how to be successful during a self driven process. The Genius Hour practice is based off of what Google implements with their development team. Giving their employees time to work on self-interest projects that have potential to improve the company, has allowed Google to create many of their popular products. What Genius Hour attempts to do is bring this ideology into your classroom. Giving students the option to choose projects that will have potential to improve their understanding of a concept or pass through a competency.
Do you have a resource you use for inquiry based instruction? Please share it below!
One of the most powerful things technology allows for our students, is the ability for student voice to be heard. Many educators who embrace the use of technology in the classroom, are still very leery of talking about social media in the classroom. The negatives of social media usage between students and teachers can be disastrous. However, if used carefully by teachers, social media can be a powerful tool to not only engage our students, but to promote their student voice as well.
DISCLAIMER: Students are not legally allowed to have a social media account if they are under 13 years old. We as educators should not encourage students to use Social Media apps before that age.
This post IS NOT suggesting that teachers connect with current students on their personal social media accounts. All discussion will be about school permitted, classroom/school accounts.
What do you mean by student voice?
To quote Bill Plamer from the Edutopia article Including Student Voice:"The term 'Student Voice' describes how students give their input to what happens within the school and classroom. Our desire is for students to know that their expertise, opinions and ideas are valued in all aspects of school life. Student Voice permeates all levels of our work together, from students participating in small group classroom conversations to students partnering in curriculum design or establishing school norms and policy." Why promote student learning/voice with social media?
Think about the power that social media tools have brought to our society. For good or bad, people share what they are doing, buying, eating, creating, and so on. In turn others are excited to try and buy the same things that they see posts about. Making an interesting change in our world's marketplace.
What about our classroom "marketplace," the marketplace of learning? If students share their learning the way they do their other daily activities, will that encourage other students to learn? I believe it will.
As equally important, what about those students who don't add much into classroom conversation. This can give them a different outlet. Maybe they feel more comfortable expressing themselves through a creative Instagram post or Tweet about what happened in class as opposed to speaking in front of all of their classmates. This outlet allows for student voice to happen outside the classroom walls.
How is this done with Social Media?
Keep it Optional: Stay away from making posts about learning mandatory. We want this to be an authentic activity for the students, something they want to do. Many may oppose or shy away at first, but it will only take a few trendsetters to get many students on board. Keeping it optional will also avoid issues with any parents who do not want their child to participate.
Open App Choice: There are so many different tools out there, and it is impossible to keep up with them all. Put the students in the driver's seat of which tool to use. Also, we know that students are into different social media tools than teachers are. Chances are if you ask a kid to post what they learned on Pinterest, they will look at you like you're crazy.
Create A Classroom Hashtag: Creating a hashtag is pretty easy, you literally just make up a phrase out of letters and numbers only and put a # in front of it! Letter casing doesn't matter, I like to capitalize each word just to make it easier to read, but you don't have to. This could even be a class activity that you allow the students to create with you!
Give Examples: Just because your students use social media for fun, doesn't mean they will automatically know how to post in a professional manner. Give them a few examples on your classroom Twitter or Instagram account.
This may seem like a scary step for many teachers to take, but these steps can help you get started on a path to get student involved in owning their learning. The benefits they will receive in learning how to use social media in a responsible manner will only improve their understanding of digital citizenship. Why not give it a try!?
As the 2017 school year comes to an end, its a time of reflection for classroom teachers. A mixture of projects, activities, and events from August to May come to mind. Hopefully for most teachers and students remembering an engaging activity that utilized technology in the classroom is part of that mixture.
During this reflection, what tool do teachers have to help them reflect upon this tech usage? The answer to that question: The SAMR Instructional Model. The SAMR Model points out the 4 categories of how technology can be utilized for students. The interesting aspect of this model, is that it differs from other educational criteria tools. The "high level" of SAMR, does not equate to a DOK level 4 or the highest level of Bloom's. Instead, the model brings an awareness that there are different levels of how technology can be used to support learning in the classroom.
The following presentation is a simple introduction to the SAMR Model that I was able to present to a group of educators. There is a task card activity included to practice identifying these levels. Feel free to share with your fellow educators.
I am an educator who is constantly in search for tools that promote student creation over student consumption. For years PowerPoint, Prezi, and Google Slides have been the "go to" presentation tools that allow for some student creation in the classroom. At times, many teachers and students look for something different to use, something a little more engaging for their audience.
There are many free online presentation tools out there, but I am going to highlight a couple that your students can use to create with. Adobe Spark
Example of a Adobe Spark Web Story
Spark offers 3 different presentation types: Social Media Posts, Web Stories (similar to a PowerPoint), and Videos. All three types are simple for students to use. Students can search for media and information without having to leave the application. This allows for a more efficient presentation development time. At the end of the presentation, all of the photos are automatically cited. For students wanting a professional looking product, Adobe Spark is an amazing option.
Buncee Edu
Buncee is a fun and simple tool for students to create engaging presentations. The platform is set up like PowerPoint/Google Slides but caters to kids more creative side. As with Adobe Spark, backgrounds, pictures, animations, stamps, and several other media types can all be searched and found within the app.
Buncee's click, drag, and search options are simple to use for all learners.
At FETC, I was delighted to attend a session by high school foreign language teacher Rachelle Dene Poth titled, Flipping Classrooms: Trading Spaces and Places Digital Tools and Ideas to Empower Students. During the session Rachelle gave attendees several resources for flipping learning for students.
However, before those digital tools were given, Ms. Poth set the stage for the why she wanted flipped learning for her students. She explained that she had a need to connect students to her classroom resources no matter their location. If a student is absent or forgets a textbook at school, they can still access the content/resources to stay current with the students in class.
Another aspect of Rachelle’s presentation was explaining the importance of putting the students in the driver’s seat. She gave examples of how she has students create their own presentations, quizzes, infographics, and more. Ms. Poth even discussed the benefits of using these student made digital projects as resources for other students to learn from. This made me think of the SAMR model and how transformative learning can be for our students when they have the flexibility to choose a tool that lets them display or explain their thinking. Rachelle’s suggestion for this was to take small steps: “pick a class to try something with, set parameters and have students create their own.”
Rachelle had many wonderful tools to share. As you look over the following list, it is important to remember to start small. Pick one or two that sound interesting, and try them out. It is easy to get overwhelmed with all of the tools out there, so take small steps for success. Ms. Poth’s presentation and handouts will also be linked in this article as well.
Now, on to the tools!
Tes Teach with Blendspace: A building tool that allows teachers to curate content for lesson delivery packages. Websites, powerpoints, Google Docs, YouTube Videos, and more all in one convenient location for your students. All of these resources can inserted right through the Blendspace search bar, or connecting your own accounts. Simple quizzes can also be created. No more multiple tabs from several links, just one clean lesson flow. The lessons can be shared several ways: a classroom in Blendspace, Google Classroom, or any other method of link sharing. Works on all devices.
Today’s Meet: A backchannel tool that allows for written conversations between teachers and students. The beauty of this tool is that it allows for a full transcript to be saved and printed. This helps keep a log of everything that was discussed in the session. An excellent tool for teachers to use during virtual office hours for students.
Quizizz: Similar to Kahoot, quizizz is a fun competitive way for students to take a quiz. In Quizizz, quiz questions are actually on the screen of the device, not just the screen in the front of the room. This allows for a quiz to be a homework assignment as well. As discussed above, having students create a Quizizz themselves based off of the content in your classroom can be a great way where students can be creators not just consumers with their devices.
Nearpod: A lesson delivery system that gives the teacher control of the student’s screen. Think of sharing a Powerpoint file or Google Slide with your students, but being in control of when the slides change on their screen. Nearpod also allows for interactive questioning, where student answers can be anonymously shared with classmates.
Formative:A student response system allows for multiple question types to be asked. Students can answer questions by multiple choice, drawing, short answer, and more.
Educreations & Explain Everything: Two very similar student explanation tools. Just as their titles imply, students create (by hand or typing) and record their voice to explain their thinking. These can be powerful tools for meta-cognition in and out of the classroom.
EdPuzzle: A student response video tool that allows teachers to bring in YouTube or other videos and add questions to them. These questions are added during the video so as the student watches, it will pause and ask the question.
Buncee:A presentation tool with creative interactive elements. Buncee allows you to add animated characters, videos, and voice over to each slide that you are working on. As with Educreations/Explain Everything, a child can use the voice over to explain the content that they place on each slide.
There were other resources shared by Ms. Poth at the workshop and below you will find the links for them. She is also on twitter, and is well worth the follow! @rdene915
Many people who use iPads and Chromebooks in the classroom know about the app Seesaw. It can be used primarily as an LMS (Learning Management System), but many of its features allow alignment with the Transformation spectrum of the SAMR Model.
Students using Seesaw can:
Take pictures and video
Annotate documents with drawings or voice
Record actions and voice on a whiteboard
Ask teachers to publish work on a class blog
Lets look at the SAMR Model and these Seesaw features together:
Modification: When students use the annotation features, especially voice and video recording, it allows “for significant task redesign.” Students can replay their recordings many times to reflect upon their learning. This reflection is a critical piece in fostering a growth mindset and meta-cognition.
Redefinition: The teachers can safely share his/her student’s work on a classroom blog and with parents. This allows the students learning to impact others outside of the classroom. They can receive feedback to make improvements on their work as well.
For ideas on activities to use with Seesaw check out the following resources below:
The #CSforALL movement continues to grow. Many students are excited about this growth, while many teachers are apprehensive. Thankfully, many websites are designed to guide the students through their learning to code journey, allowing the teacher to act as a facilitator. In other words, classroom teachers at the elementary through middle school levels aren't expected to be coders or programmers themselves. These teachers can oversee the progress of their students as they begin to take interest in this journey. Look into the following sites to get your students started.
Code.org (K- Adult) Most famous for the "Hour of Code," Code.org is a great place for students to begin their coding experience. Younger students learn the coding process through block coding and then gradually begin to use Java, a coding language. The site has really taken off with a teacher dashboard. Teacher's can create a section for students to sign into so their progress can be followed. Complete lesson plans and modules are ready to go for teachers to assign to students K- 5. Middle school teachers have complete lesson plan access to Computer Science in Algebra and Computer Science in Science materials. Code.org also offers free PD for teachers either in person or online. All of these links are found on their Teacher Dashboard Page.
Scratch(3rd Grade - Adult) Created by MIT, Scratch is a great site to learn coding. It is highly engaging for students as they get to create different scenes for characters (or sprites) to act out in. Scratch allows students to share their creations to a project board for others to see. Once students get started, they can click the Tips tab at the top of the screen and there are many tutorials to guide them through their learning process.
Codecadmey(Middle School - Adult) Codecadmey focuses more on the coding languages than block based coding. I would recommend this site for those students who rapidly completed block coding and are ready for that next step. What I like about Codecadmey is that it clearly lays out the programming language options on a menu for people to choose from: HTML, CSS, JAVA, and PYTHON just to name a few.
Pencil Code(Middle School - Adult) Pencil code not as self explanatory as the previous two sites, but it does have some great features. The Materials for Teachers page breaks down concepts one by one, allowing teachers to hone in on particular skills. It's almost like grabbing a particular "worksheet" off of the shelf for a specific skill. Pencil code promotes the student creativity side of coding very heavily. There are art, music, and game making playgrounds for students to explore. I'm not sure I'd start off with pencil code, but it is a great place to send the students that get through code.org's Hour of Code quickly.
Digital Literacy is a term that is growing ever more popular among those teaching our 21st Century Learners. Also known as Information Literacy, Digital Literacy is an important component of what is known as Digital Citizenship. It is a skill that many children and adults grapple with. One of my favorite memes on the topic is right here!
We all chuckle, but then the conversation kind of fizzles out from there. It isn't that we shouldn't believe anything that we find online, it is that we need to be critical of the validity of what we find.
I often hear teachers say, "kids are so lucky now, they can just search for the information they need on the internet. They have the answers instantaneously." While it may be true, the statement doesn't take into account that students must be critical and validate information that they find. I argue that this was not a skill that previous generations had to grapple with as much. For example, as a child of the 80's and 90's, when I went to the library to look up information in encyclopedias and books, I didn't have to deeply question the validity of material found. I may have looked at publishing dates, but I hardly questioned who the author was, or the publishing company of the source. (I'm speaking of non-fiction texts of course) Yes our students can quickly access information, but they have to learn how to validate and be critical of that information.
So that leads to the following question: "How do I teach kids how to validate what they find online?"
Here are just a few resources out there to support teachers as they develop this 21st Century Skill with their students.
November Learning: Education Resources for Web Literacy - Middle School & Up This site has 7 different steps to walk students through as they begin to learn about internet information, urls, domain names, and so on. It begins with a pre-test to give students an idea of where they stand.
Part of the purpose for student usage of technology in the classroom is to allow students to become creators not just consumers. A large part of this creative process for our learners is the resources that they find to put into their product. In this case we are talking about visual resources, or images.
Many students and teachers go directly to Google and search images. They then copy and paste away. As many of us know, this can rise several issues. Two of them being:
Inappropriate images appearing within the search.
The use of pictures without permission of the rightful owner.
These issues (and several others) have created the need of safe searching creative commons photos for educational use. Luckily there are several websites that students can go to for that very purpose!
Photos for Class - Just as the title says, this site allows students to search for photos that are appropriate for classroom use. The photos also include auto citation, and creative commons photos for use. If a student search does bring up an inappropriate image, it allows teachers to report it to be removed.
Pics4Learning - Pics4Learning is another safe place for students to search for needed photos. The organization of the site is excellent, and allows students to easily search by category.
Pexels - Pexels is full of large sized creative commons stock photos. Some of them are truly breath taking. Pexels was created for student and adult usage, so it isn't quite as filtered or safeguarded. There isn't anything extremely inappropriate, but some images could contain things like alcohol usage and mild adult situations. Students, especially younger students, should be monitored during the usage of this site. Nevertheless, landscapes, citiscapes, and other stock photos are excellent on this site.
*Addition to original post: These sites try their best to filter out inappropriate photos. As with anything online, there is nothing completely safe. Inappropriate pictures could still appear on these sites. However, they are still safer than simply searching google photos.